Mastering Elden Ring Nightreign: The Ultimate Day 1-3 Strategy Guide
Master Elden Ring Nightreign with strategic planning, quick decisions, and optimal routes to conquer the formidable Nightlords and enhance your gameplay experience.
Elden Ring Nightreign presents a formidable challenge that demands strategic planning and quick decision-making. Even seasoned Elden Ring veterans might find themselves overwhelmed by the game's relentless pace and complex progression system. Without a clear roadmap, many players struggle to build enough power to confront the imposing Nightlords effectively. Let's dive into the optimal approach for conquering this challenging expansion.
Day 1: Laying the Foundation
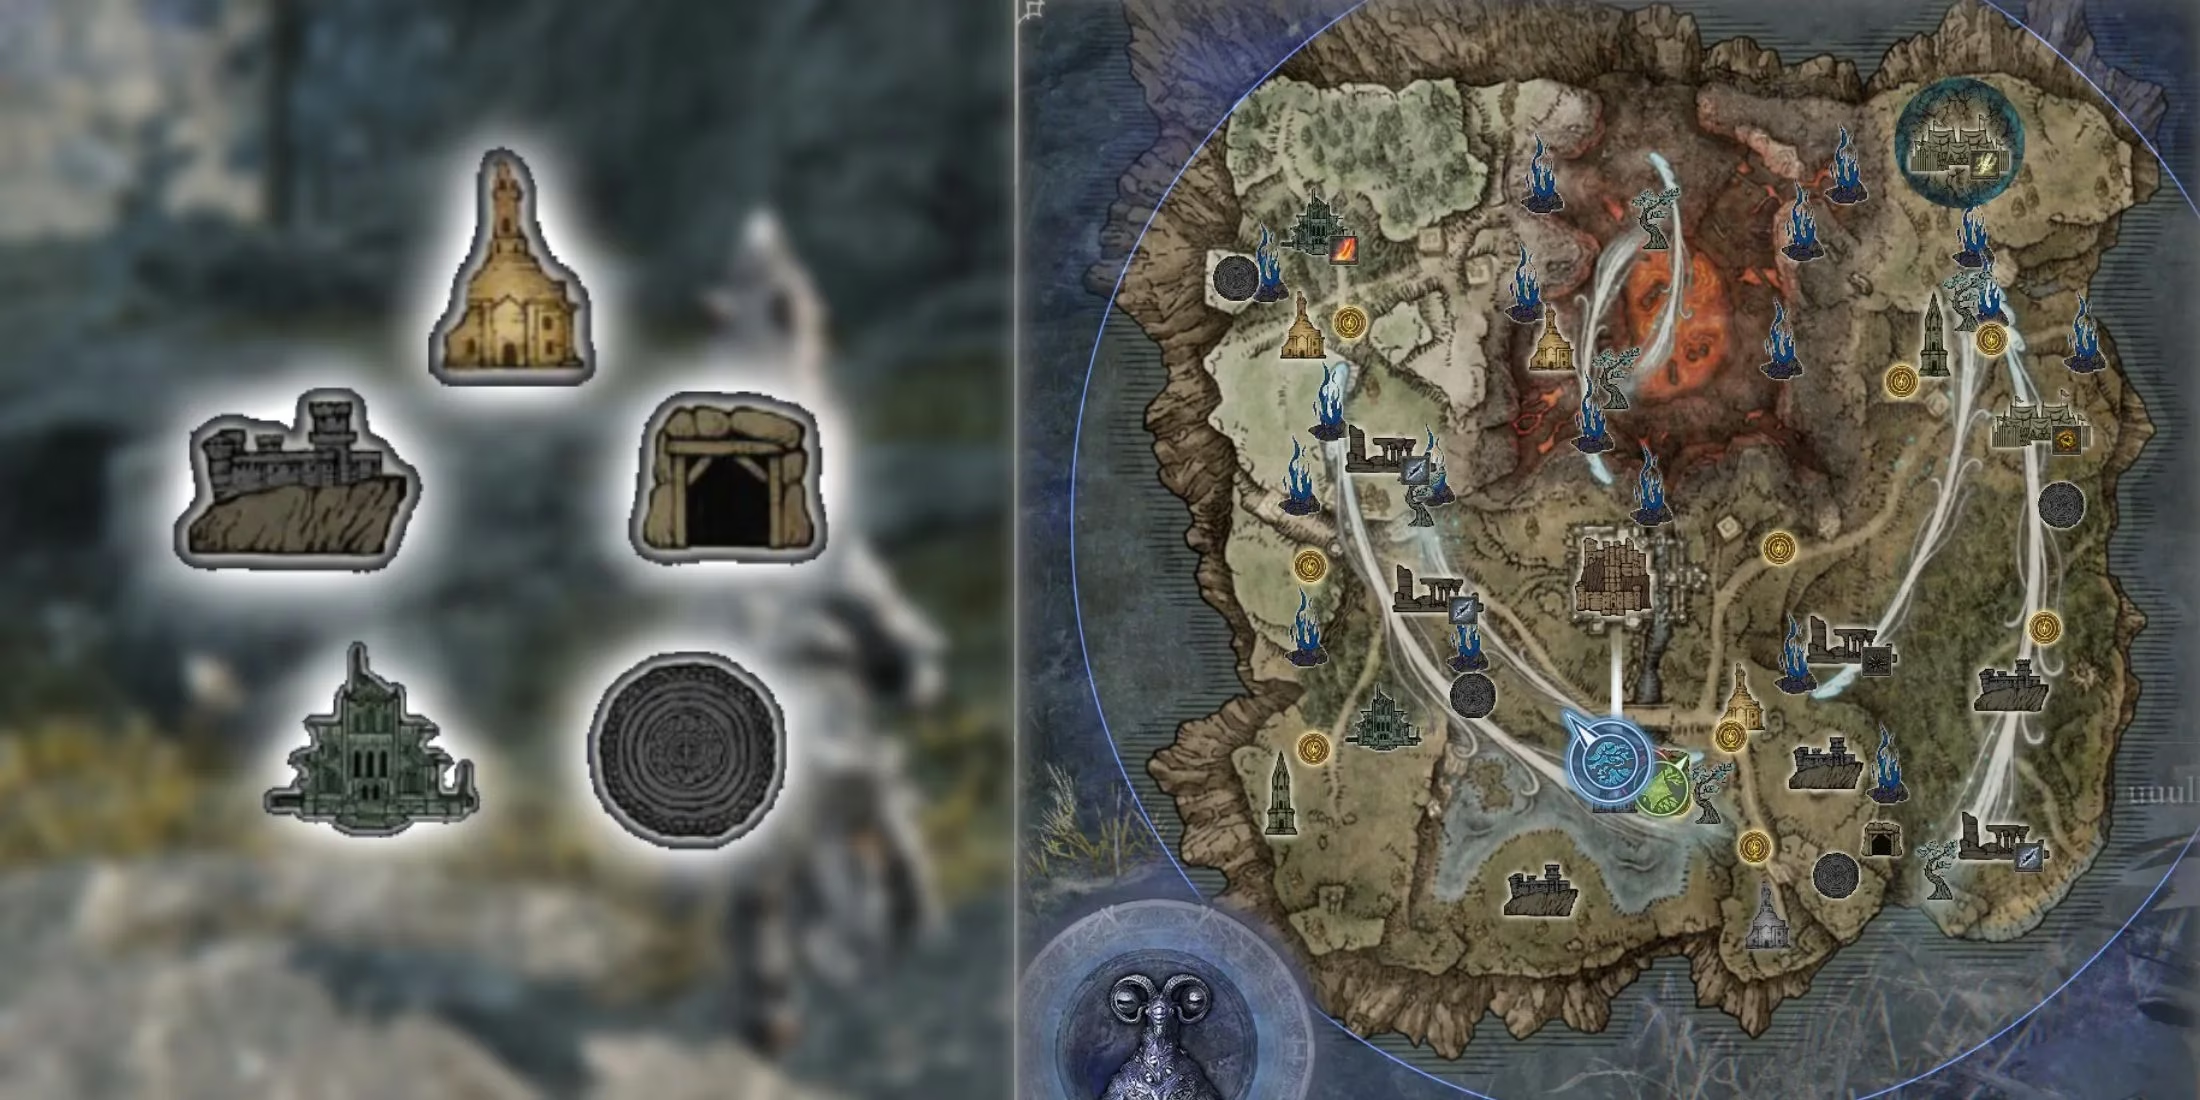
When first arriving in Limveld, immediately open the map and identify all Church locations and points of interest that correspond to your targeted Nightlord's weakness. While these weakness locations aren't mandatory for Day 1, knowing their positions allows for efficient routing on Day 2 if necessary.
Before landing, formulate a clear plan. The optimal approach involves heading to the nearest Church while hitting major points of interest along the way, particularly locations with bosses that can be defeated at low levels.
Players typically land near a small enemy encampment. The first priority should be eliminating this group to quickly reach Level 2, then proceeding to the first point of interest—preferably a Church.
Day 1 Priority Locations:
-
Great Churches: Usually guarded by a Golem, Oracles, or Fire Monk boss depending on the location's affinity. These bosses can be defeated even at Level 2.
-
Forts: Typically house Abductor Virgins, Lordsworn Captains, Archer Golems, or Crystalians. Surprisingly manageable at early levels.
-
Caves: Always contain a Giant boss that rewards either a standard boss drop or a valuable Smithing Stone +2, which should be acquired in most runs.
Around Level 5-6, players should expand their targets to include Camps and Ruins. These locations feature more challenging multi-part boss encounters but offer substantial XP rewards and numerous chests containing valuable gear.
The optimal goal is to reach at least Level 6 by the end of Day 1, positioning for Level 7 by Day 2's beginning. After the second ring closes, mark the final ring on your map and make your way there, eliminating any enemy groups encountered for additional Runes.
Confident players should look for optimal early locations near the final ring. The closer these locations are to the final ring, the more time you'll have to defeat bosses and collect additional Runes before Night 1 begins. But isn't it tempting to push your luck just a bit further? That extra boss might make all the difference...
Day 2: Power Acceleration
After defeating the first Night Boss, Day 2 begins as the Night dissipates, allowing players to venture back into Limveld for further progression. As soon as the actual ring disappears, use Surge Sprint to reach your next destination.
Day 2 Priority Locations:
-
Boss weakness points of interest: If missed on Day 1, these should become your primary focus, especially locations near the map's edge.
-
Remaining Churches: These will increase your Sacred Flasks to at least 6 (potentially 8-9 depending on spawn rates).
Depending on the distribution of these priority locations, players can tackle Evergaols (with Stonesword Keys) or unmarked Field Bosses along their route. Exercise caution and avoid spending excessive time on any single boss—if your damage output is insufficient, retreating is wiser than risking a level loss.
Around Level 9, the Castle becomes a viable target, particularly if the Ring encloses it within the safe zone. While the Castle's location remains constant, it contains various high-level enemies such as Banished Knights, Crucible Knights, Giants with explosive magic pots, Golems, and other formidable foes. By Level 9, most of these enemies should be manageable, especially with a coordinated group.
The reward scales with enemy difficulty: Golems offer minimal Runes, while Crucible Knights and Giants provide a substantial 18,000 Runes per defeat. Spend time farming these high-tier enemies until reaching approximately Level 10-11.
After the first ring closes and you've farmed the Castle, your power level and equipment should be sufficient to focus exclusively on Field Bosses. However, some Field Bosses present significantly greater challenges than others.
Field Boss locations appear on the map at Day 2's beginning—look for purple icons with glowing red demon faces. Approach cautiously and assess whether your party can realistically defeat each boss.
Generally, Valiant Gargoyles rank among the most challenging Field Bosses due to their enormous health pools and devastating attacks. Death Rite Birds also pose significant threats with their Ghostflame abilities that can rapidly eliminate Nightfarers.
Most other Field Bosses are viable targets for any group, rewarding substantial Runes and high-tier rewards. With optimal play, you should reach at least Level 12 after defeating one or two Field Bosses. But what if you're feeling particularly ambitious? Could taking down that Death Rite Bird be the key to unlocking an even stronger build?
Shifting Earth Events: Game-Changing Opportunities
Nightreign features four Shifting Earth events, with three typically worth completing during your run (excluding the Mountaintop in most cases).
If a Shifting Earth event is active, the final ring on Day 2 will always form in that area. It's advisable to head in that direction when the first ring begins closing to ensure sufficient time for completing each objective.
Each Shifting Earth event hosts various Field Bosses and high-level enemies that provide substantial Runes, making them valuable for leveling alone. Three events offer particularly worthwhile rewards:
-
The Crater: Contains a smithing table deep underground that upgrades any armament to Legendary quality and removes its level requirement. Reaching the bottom of The Crater on Day 1 allows equipping otherwise unusable powerful weapons early.
-
The Rotted Woods: Grants Scarlet Rot immunity for the remainder of your time in the woods, plus an HP boost and health recovery when attacking quickly after taking damage. Requires activating a nearby Fort first to locate this power.
-
Noklateo, the Shrouded City: Rewards the ability to return from Defeat once if you can reach the inner temple and defeat the Astel boss guarding this power.
The Mountaintop, while generally less valuable, becomes crucial when targeting Caligo, Miasma of Night (the Nightlord of the Fissure in the Fog expedition). This Nightlord deals Frostbite damage, and the Mountaintop power grants bonus Attack Power when Frostbite procs nearby while reducing Frostbite buildup by 50%. When facing Caligo with the Mountaintop Shifting Earth event active, obtaining this power should become a major priority after the first ring closes on Day 2.
Day 3 and Beyond: The Final Challenge
By Day 3, your character should be well-positioned to face the final Nightlord challenge. With optimal routing through Days 1 and 2, you'll have accumulated the levels, equipment, and special powers needed to stand a fighting chance.
But even with all this preparation, the Nightlords remain formidable opponents requiring precise execution. Have you considered how your build synergizes with your team composition? Would sacrificing some personal power for group utility ultimately lead to greater success?
As we look ahead to future Elden Ring Nightreign updates, one can't help but wonder how FromSoftware might evolve this formula. Will we see new Shifting Earth events? Additional Nightlords with unique mechanics? Or perhaps entirely new systems that further transform this already complex experience?
The beauty of Nightreign lies in its endless strategic possibilities. No two runs are identical, and the adaptability required keeps even veteran players engaged. What strategies have you discovered that differ from this guide? And how might the meta evolve as players continue to explore the depths of this challenging expansion?
🔥 Pro Tips for Nightreign Success 🔥
-
Communication is key in group play—coordinate your routes and boss targets
-
Don't hesitate to abandon difficult encounters if they're consuming too much time
-
Always prioritize your Sacred Flask count early in Day 1
-
Remember that weapon type advantages against specific bosses can be more important than raw stats
-
The most efficient runs often involve planned routes rather than opportunistic exploration
What unconventional strategies have worked for your Nightreign expeditions? The community continues to discover new approaches even months after release!